2. Walkthrough
2.2. Part 1: "The Investigation" (3)
~~~~~~~~~~
Main Deck
~~~~~~~~~~
Just go to the left and down the Sector 2 elevator...
~~~~~~~~~~~~~~~~~~~~
Sector 2, TRO(pical)
~~~~~~~~~~~~~~~~~~~~
Into the Navigation room, NOW!
^^^^^^^^^^
MISSION 3:
"You Da Bomb"
^^^^^^^^^^
STORYLINE: Adam has spotted that Samus clone we saw earlier. He's named it the
SA-X. He informs you that it has the Ice Beam and can freeze you, yada
yada...but that's not important. What's important is that we get the Bomb data
that HQ has ready. Unfortunately, we must activate Level 1 locks first...let's
move out!
Just like Sector 1, there are Save and Recharge rooms just beyond the
Navigation room. They should be helpful. Now, in the first main room, you'll
spot some slow-moving red guys on the wall. They're called Geemers, and they
cause an annoying amount of damage. Try to avoid them, as they also take an
annoyingly long time to kill. Now, make your way to the top right corner of the
room, ignoring the blue doors along the way At one point, you'll have to shoot
two blocks with your beam to break them away. Do so. In this next room, just
make your way to the right, jumping over the lone Geemers. You'll end up in a
vertical shaft. Make your way to the top left (there's more Geemers in here as
well) and in the next room, drop down and step on the switch. Voila, we've
released Level 1 locks! Blue doors are now active!
Now, make your way back to the main Sector 2 room (the one with the blue doors
we had to ignore.) Go through the bottom left blue door. Make your way to the
right until you reach the room just in front of the Data Room. Predictably,
just go through the top left door and download the ***BOMBS***.
----------------|
MISSION COMPLETE|
----------------|
Now, make your way back to the Navigation room...what's that, there's been an
explosion? The door to this area's been destroyed? Looks like we'll have to
find another way back...first off, bomb the cracked blocks on top of the ledge
in the upper right corner. Roll through and grab the ***MISSILE TANK*** (8/48,
50.) Now, go to the very bottom left corner and bomb the blocks there. You'll
open up a secret passage! Roll through the tunnel, then go through the right
door to save your game. Then proceed through the left door. In this room, bomb
the out-of-place block on top of the ledge, it'll look like this:
_
__|_|_____|
When the bomb explodes, a metal pillar will rise up out of the ground. Now,
shoot your beam at the cracked block in the left wall, and roll through. In
here, bomb the odd-looking block three spaces to the left of the out-of-place
block. Another pillar will rise out of the ground, allowing you to access the
***MISSILE TANK*** (9/48, 55.) Now, go back to the vertical shaft. Make your
way to the bottom, bombing any blocks in your path (almost all of them are
breakable.) Go through the bottom left door. Drop down this shaft and go
through the bottom right door. You'll be in another big room. Go to the bottom
left and drop through the crumble blocks. You'll see a Super Geemer, AAAAAH! It
take about 20 Missiles to kill! I suggest you avoid it! Bomb the base of the
ledge to the right, and you'll open up a secret passage. Roll through and grab
the ***MISSILE TANK*** (10/48, 60.) Shoot the block directly above where the
tank was to get out of here. Then, hop up on top of the ledge and bomb the
block. Proceed to the bottom right door. In here, jump over the first ledge and
drop into the alcove. Destroy the two red enemies. Uh-oh, now it looks like
you're completely stuck. But fear not, there is a way out! Lay a bomb two
spaces to the left of the right 'tower' and a metal pillar will rise up,
allowing you to get out. Continue to the right, and you'll be in yet ANOTHER
vertical shaft. *sigh* Climb up the shaft until you spot a door on the right
(don't go in it yet) within an 'alcove' that you can jump into but cannot jump
out of. Again, DON'T go down to that door, go through the door on the left instead. In this room (there will be a big pit of water), drop into the water.
Lay a bomb three spaces to the right of the left wall. A metal pillar will rise
up, allowing to jump up and roll through the small hole in that wall. Go
through the door on the bottom left. In this next room, lay a bomb four spaces
to the left of the door and another metal pillar will rise up. Shoot your beam
at the wall to make the odd-looking block break away, then roll through and
grab the ***MISSILE TANK*** (11/48, 65.) Return to the vertical shaft and go
through the door on the right. Now, make a beeline to the right and you'll end
up in a Save Room. Save if you wish, then keep going to the right. Soon enough,
you'll reach a room with an ***ENERGY TANK*** (4/20.) After you grab it, go to
the base of the ledge that the door is on and shoot the blocks below Samus'
feet. They'll crumble away, dropping you in front of a Boss Door. Shoot it with
three Missiles or two Charge shots to destroy it, then continue on to your
second boss...
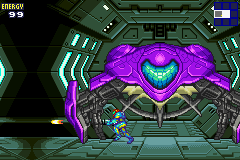
-----------
BOSS BATTLE|
POGO-X |
-----------
Pogo-X is a gigantic cyclops creature that does absolutely humongous jumps over
you. Ignore it when it does these jumps; you're waiting for it to do a 'little'
jump where it doesn't spring overtop of you. It will instead 'parachute' to the
ground, at which point you must shoot Missiles or charged shots at the exposed
area. If it latches on to you, lay some bombs to make it spit you out. Pogo-X
will get faster as more damage is done to it, and eventually only the 'eye'
will be left and every jump will be a parachute. However, as this time the
target area is halved in size, so you'd better have good aim! After about 15
Missiles (or 6 charged shots) the Core-X will appear. Four Missiles will break
its shell, enabling you to grab the ***HI-JUMP*** and ***JUMPBALL*** abilities.
Now just leave the room from the same way you came. It's time to FINALLY get
back to the Navigation room. Return to the vertical shaft that we trapped
ourselves in before. You can easily jump out of the little alcove now! Awright!
...uh-oh. The way back to that vertical shaft has been destroyed...looks like
we'll have to find another way around. Bomb the blocks in front of the wrecked
door and drop down into the next room.
What's that eerie music? What are those echoing footsteps? What's that beating
heart sound? It's...THE SA-X! AAAAAH! Wait, it's just going towards the door.
Ignore it, as it can't see you. Once the music fades, continue through that
door yourself. We're back in the vertical shaft. Go in the next door on the
left as you make your way up. Swing across the ceiling and grab the ***MISSILE
TANK*** (12/48, 70) on the other side. Back to the vertical shaft, at which
point you can make your way all the way to the top. Once you reach the narrow
passage near the top, bomb the block in your path, then use your Jumpball to
propel yourself up to another bombable block in front of the door. Continue
through the door. In this room, use the hangings to get to the top, but morph
into a ball on the right hanging. Bomb the block there, then roll through and
get a lovely ***MISSILE TANK*** (13/48, 75.) Now, roll through the passage at
the top of the room. FINALLY, we're back in the main room! Bomb the block in
front of you! However, we still have a few things to do before we get a new
mission. First off, go through the blue door directly above where you entered
from. In here, go up to the right wall, use the Jumpball, and at the top of
your jump, lay a bomb. Whaddya know, a hidden passage...go grab the ***MISSILE
TANK*** (14/48, 80.) Now go back to the main room. Go through the grey door
directly below the Navigation/Save/Recharge rooms. In here, jump over the green
pillar and grab yet another ***MISSILE TANK*** (15/48, 85.) Now, go back to the
Navigation room (YAHOO!)
Adam will give you the general jist that we were too late in destroying the X,
AGAIN. Since we released the Level 1 locks and took such a long time getting
back here, the X have had time to fully infest Sector 4. We've gotta get over
there. Up the elevator...
|