2. Walkthrough
2.4. Part 3: "The Showdown " (5)
^^^^^^^^^^^
MISSION 17:
"Self Destruct Imminent"
^^^^^^^^^^^
STORYLINE: This is it. The Federation is coming to get Samus and capture the
SA-X. You must stop them. It's time to blow up the station and all the X within
it. Samus has been the Federation's puppet the whole time...
After an irritatingly long briefing, go up the elevator to the Main Deck. Go up
the Main Elevator, and proceed to the Operations Deck (it's the place with the
Data Room on the map, just to let you know.) I suggest you save along the way
(you can't use the Save Room in the Operation Deck, so you'll have to use the
one by the last Power Bomb Tank.)
Once you reach the Operations Deck, go to the top left door in the big room and
there will be an earthquake! AAAAAAAAAH, IT'S THE SA-X! RUUUUUUU-wait a minute,
we've got the Wave Beam now...we can hurt that bastard! It's time to show that
thing who's boss!
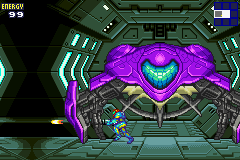
---------------
BIG BOSS BATTLE|
SA-X |
---------------
This battle is easier than you'd expect: you should be able to beat this thing
on your second or third try, or even your first if you nail down my strategy
well enough. Remember, the SA-X can only be hurt with charged shots...
As soon as you hear the earthquake, go to the lowest ledge on the left-hand
side of the room. There will be a one-block ledge above it, and then above
that, the door leading to the Data Room. Stay on this ledge for the whole first
phase of the fight. SA-X will either Screw Attack onto the one-block ledge
above you, where you can easily pump a charged shot diagonally up at it, or it
will Screw Attack onto your ledge, directly in front of you, where you can also
easily hit it with a charged shot. After the first hit, if it was on the ledge
above you, it will either Screw Attack down to your platform (and most likely
hit you) or go directly in front of you on your ledge. If you hit it when it's
directly in front of you on your ledge, then it will either fall down and jump
right back up again, allowing another easy hit. If it doesn't jump right back
up to your ledge, then it will Screw Attack under your platform and begin
running to the right off the screen. Hit it with a diagonal down shot as it's
going off-screen, and it will either Screw Attack under your platform and run
to the right again, or jump up to your ledge. Pretty easy pattern, no? If you
don't shoot it before it runs off screen, then it will either instantly come
back onscreen and jump onto your ledge, or take three seconds off-screen and
then jump onto the ledge above you. Twenty or so charged shots will do SA-X in.
However, just when it looks like you've won, the SA-X will transform into a
giant monster! Although it looks intimidating, this guy is a joke. Three or
four charged shots will kill it, and the only attack it has is a jump, which is
easily dodged simply by moving out of the way before it lands.
After the monster dies, an Eye-X will appear. Watch out; this one shoots Ice
Beams, which can take off two whole Energy Tanks in one fell swoop! Five
charged Missiles or ten uncharged Missiles to kill the Eye-X. Grab that Ice
Beam! Hey, it's escaping! AAAAAAARGH! Once the Core-X floats off-screen, the
music will finally fade and the top left door will unlock. Go through and step
on the switch inside.
----------------|
MISSION COMPLETE|
----------------|
Unfortunately, a 3-minute timer has now been set. Get outta here, fast! It's a
completely linear path back to your ship (and no, you can't save along the way,
sorry.) Once you reach the Docking Bays, things will look a
bit...different...and once you finally reach your ship, it's...NOT THERE!!!
WTF!? Instead, you'll see a gigantic egg. Now if you try to go back to the
left, a big fugly guy will pop out.
-----------------
FINAL BOSS BATTLE|
OMEGA METROID |
-----------------
Walk up to that guy and pump some shots into it! Heh, heh, it's a wimp-until it
SLASHES YOU AND BRINGS YOU DOWN TO 01 ENERGY! You can't move...and now the
Omega Metroid slowly lumbers toward Samus...this is the end...but, all of the
sudden, that Core-X that escaped earlier floats in, and the SA-X reappears.
It's using the last ounce of its strength to vanquish its natural enemy...but
it soon meets the same fate that we did, and is hit by Omega Metroid's slash
attack. It then reverts to a Core-X again. Wait a minute...you've regained
control of Samus! Absorb the Core-X to get the ***OMEGA SUIT*** and ***ICE
BEAM***!!! BOO YEAH!
This battle is just plain sad. Hold the L button throughout the whole fight,
and charge up your Ice Beam. You don't actually need to use charged shots, but
it's easier and quicker (as if the battle wasn't already quick and easy enough,
eh?) Now, just run up to it, release your charged shot into Omega Metroid's
chest, then run back to the left, charge up another shot, and repeat.
Obviously, don't get hit by the slash attack, because it takes off a full
Energy Tank with each hit and stuns you for a few seconds. Otherwise, this is
one of the easiest bosses in the game. Fifteen charged shots or so for the
kill. How anticlimactic...
You have now completed Metroid Fusion! Congratulations! |